Today, as more and more commercial devices start to use dual-band GPS module (typically L1+L5) for improved location accuracy, the testing needs for dual-band GPS receiver have been increased significantly. To meet those requirements, N7609C Signal Studio for Global Navigation Satellite Systems 2026 added L1+L5 dual-band GPS signal generation capability in August 2019. This topic provides a demo guide for testing L1+L5 GPS receivers with the N7609C.
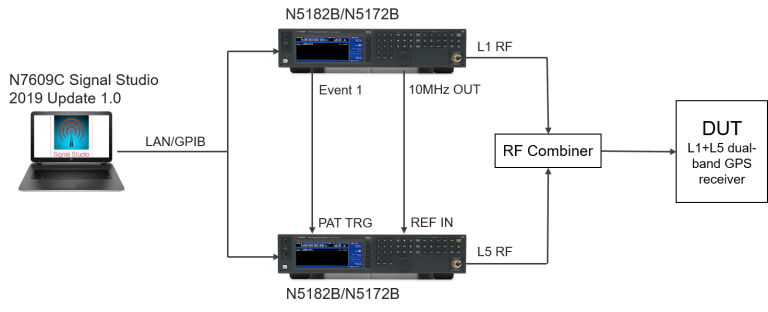
Modern GPS satellites Block IIF transmit navigation signals on L1 band (1.57542 GHz) as well as L5 band (1.17645 GHz). Having 2 bands signal received will facilitate the receiver to reduce the pseudo-range error and therefore improve the location accuracy. To generate L1+L5 signals simultaneously, two N5172B/N5182B signal generators with options 503, 656 and 660 are required, as the frequency gap between L1 and L5 (400 MHz) is larger than max 160 MHz modulation bandwidth of the signal generator. In addition, two signal generators must keep in synchronized playback, i.e. using one to trigger the other, so that the signals from both instruments are in good synchronization.
Launch the N7609Csoftware.
Click System > Run System Configuration Wizard and select 2.Dual Bands.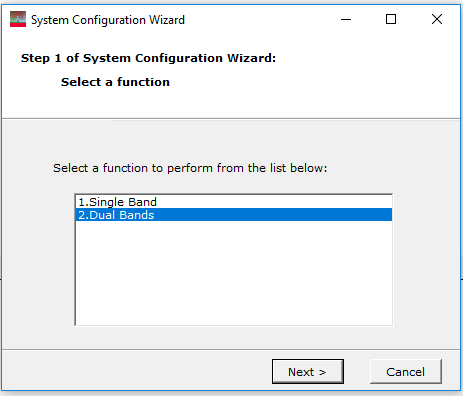
Click Next to enter the IP address of two signal generators and make sure the connections to each are successfully established.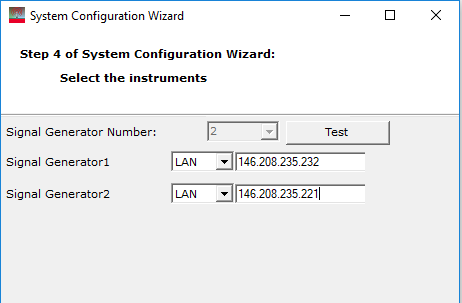
Under the GNSS node, change the Capability to Advanced Real-time Signal Generation Pro, where you can configure the dual-band L1+L5 GPS signal generation. Basically, those parameters are similar to previous single-band configurations, but simplified, and you can create a static scenario to simulate a stationary receiver with fixed longitude/latitude/altitude or a dynamic scenario for a moving GPS receiver along a given trajectory. One enhancement is that you do not have to save the scenario to a file as in the single-band case, and you can simply click the State On button to push those scenario settings to the instrument and start the real-time scenario and signal generation on both bands immediately. During the signal play, you can also change the editable parameters to update the real-time output signal.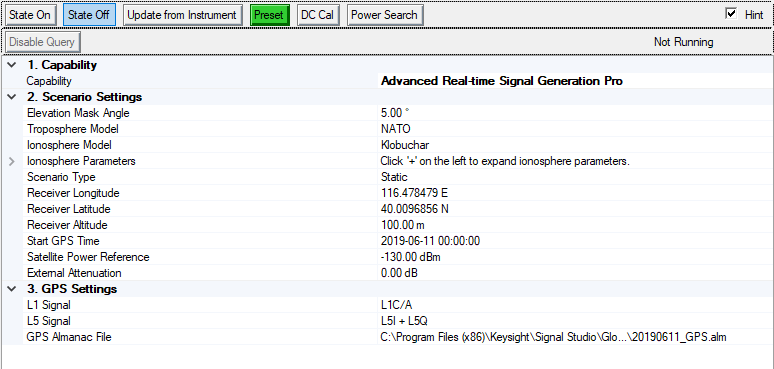
You do not have to specify the frequency for L1 or L5 manually. The N7609Csoftware will take care of that automatically in dual-band capability.
Under 3. GPS Settings, you can configure the state of signal component on each band independently. For example, control L5 band to transmit L5I only or L5Q only or both. Note that most receivers will first acquire GPS L1 as an anchor and may not be able to get location fix with the L5-only signal.
All the graphical views are the same as previous software versions that display real-time satellite status and the trajectory during the signal playback.
After a cold start on GPS receiver side, you can perform various testing on the receiver. For example, TTFF, acquisition/tracking sensitivity, location accuracy, etc.